ร่วมขับเคลื่อนโดย
Saturday, October 17, 2015


Thursday, October 8, 2015
6:20 AM
No comments
เมื่อคุณมี VPS เป็นของตนเอง ซึ่งได้ติดตั้งระบบปฏิบัติการณ์ CentOS แล้ว
หากคุณต้องการที่จะจัดการและควบคุมเว็บไซต์ Kloxo MR
คือทางเลือกหนึ่งที่จะช่วยให้คุณสามารถควบคุมและจัดการเว็บไซต์ด้วยตนเอง
เพีบงแคาคุณมี MySQL และ PHP
ก็สามารถสร้างเว็บไซต์จำนวนมากตามที่ต้องการได้แล้ว
Kloxo ถือว่าเป็น Web panel ที่เปิดให้ใช้ฟรี และใช้งานได้ดีด้วย คุณจึงไม่ยุ่งยากกับการใช้งานในครั้งแรก งั้นเรามาดูวิธีติดตั้งการใช้งานบน CentOS กันเลย
วิธีติดตั้ง Kloxo MR
ขั้นที่ 1. อัพเดท Server :
ขั้นที่ 2. ติดตั้ง package ที่จำเป็นต้องใช้ :
ขั้นที่ 3. ปิดการใช้งานของ SELinux ก่อน :
ถ้าไม่สามารถปิดได้ให้ใช้คำสั่งนี้แทน :
ขั้นที่ 4. ดาวน์โหลดโปรแกรม :
ขั้นที่ 5. ติดตั้งโปรแกรม :
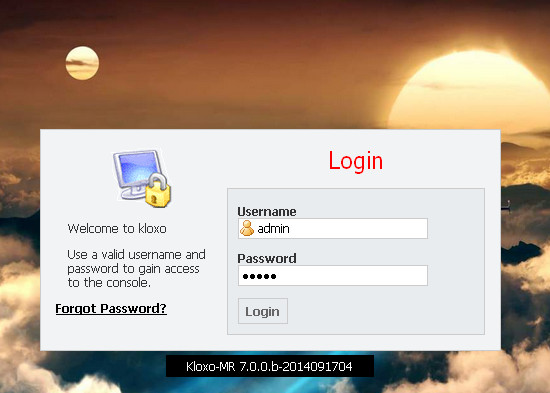
เป็นอันเรียบร้อย คุณจะได้ลิงค์สำหรับใช้งาน รวมถึง username และ password
Kloxo ถือว่าเป็น Web panel ที่เปิดให้ใช้ฟรี และใช้งานได้ดีด้วย คุณจึงไม่ยุ่งยากกับการใช้งานในครั้งแรก งั้นเรามาดูวิธีติดตั้งการใช้งานบน CentOS กันเลย
วิธีติดตั้ง Kloxo MR
ขั้นที่ 1. อัพเดท Server :
yum update -y
ขั้นที่ 2. ติดตั้ง package ที่จำเป็นต้องใช้ :
yum install yum-utils yum-priorities vim-minimal subversion curl zip unzip -y
yum install telnet wget -y
ขั้นที่ 3. ปิดการใช้งานของ SELinux ก่อน :
setenforce 0
ถ้าไม่สามารถปิดได้ให้ใช้คำสั่งนี้แทน :
echo 'SELINUX=disabled' > /etc/selinux/config
ขั้นที่ 4. ดาวน์โหลดโปรแกรม :
cd /tmp
rm -f mratwork*
wget
https://github.com/mustafaramadhan/kloxo/raw/rpms/release/neutral/noarch/mratwork-release-0.0.1-1.noarch.rpm
 --no-check-certificate
rpm -ivh mratwork-release-0.0.1-1.noarch.rpm
cd /
ขั้นที่ 5. ติดตั้งโปรแกรม :
yum clean all
yum update mratwork-* -y
yum install kloxomr7 -y
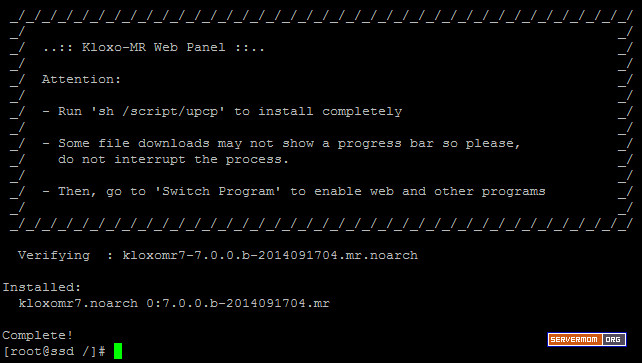
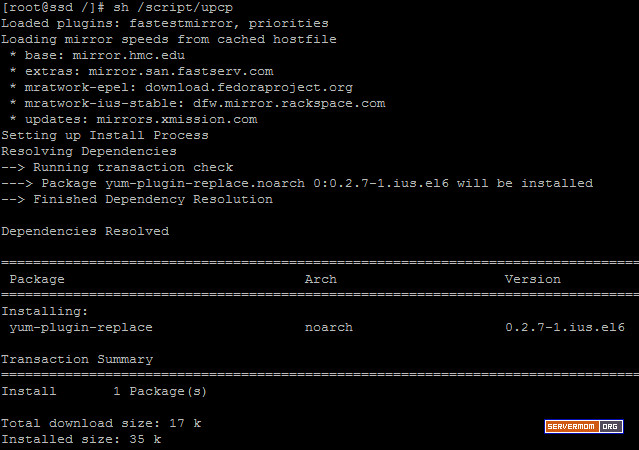
sh /script/upcp
เป็นอันเรียบร้อย คุณจะได้ลิงค์สำหรับใช้งาน รวมถึง username และ password
6:19 AM
No comments
Kloxo-MR is another alternative of free web hosting / server control
panel that can be solution for you who don’t want to manually install
webserver, MySQL and PHP. The software is basically a fork of original
Kloxo CP by LXCenter. The MR part of Kloxo-MR is Mustafa Ramadhan, the
one who did the fork, enhance and develop this truly modified version. I
posted that Kloxo users should be more aware because it has recently got new exploit but then Mustafa Ramadhan claimed that Kloxo-MR is not vulnerable with the same exploit.
I was never use Kloxo (and Kloxo-MR) before not because it’s bad but Kloxo is too complete for a free web panel. It has a bunch of advanced features making new users a bit frustrated in using it for the very first time. But then I decide to write a tutorial about it and I choose Kloxo-MR.

Step 2 – To make sure all things are updated, run ym update command:
wait for the process to complete

Step 3 – Issue this command to install some necessary packages:

Also this one:

Step 4 – Make sure SELinux is disabled. You can check it with this command:
sample output:

if not, you can disable it using this command:
Step 5 – Now you can add repo URL of Kloxo-MR. Currently -during I write this post- there are two main version: v6.5.0 and v7.0.0. This guide will show you how to install Kloxo-MR v7.00. Start by changing directory to /tmp.
then remove old .rpm if any:
Then download the repo file using wget:
pic:

then go back to upper directory
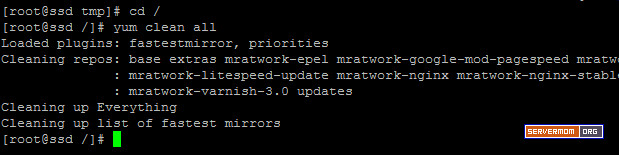
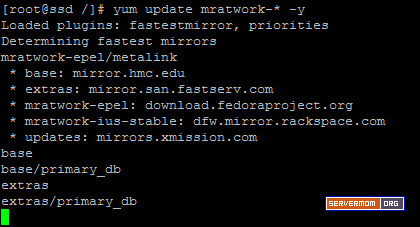
Step 6 – Now issue these series of command before we proceed to the install process:
pic:


Step 7 – Now begin the install process with this command:

Once done you’ll see something like this:

Step 8 – Now the last magic command to issue is:
That will install everything so the process will be a little bit
longer than any previous command above so sit tight and wait till it
finished.

And once done you’ll see something like this:

Step 9 – Now open up your favorite web browser and login to Kloxo-MR admin page for the very first time:
https://1ip-address:7777 – secure ssl connection, or..
http://1ip-address:7778 – normal one.
Default username is admin and password is admin.

That’s it. Wait for my next article. Do not forget to follow
I was never use Kloxo (and Kloxo-MR) before not because it’s bad but Kloxo is too complete for a free web panel. It has a bunch of advanced features making new users a bit frustrated in using it for the very first time. But then I decide to write a tutorial about it and I choose Kloxo-MR.
Why Kloxo-MR?
Did I explain it’s not too vulnerable already? Now it’s time to check its key features which I think too complete and best of all you can get it without paying a penny. Let’s check out:- Supported OS: Redhat / CentOS 5 and 6 (32bit and 64bit) or their variants
- Billing Software: AWBS, WHMCS, HostBill, TheHostingTool, AccountLab Plus and Blesta (note: claim by billing’s author)
- Web server: Nginx, Nginx-Proxy and Lighttpd-proxy; beside Httpd and Lighttpd (in progress: Varnish, Hiawatha, ATS and Httpd 2.4) *)
- Php: Dual-php with php 5.3/5.4 as primary and php 5.2 as secondary (in progress: multiple-php) *)
- PHP-type for Apache: php-fpm_worker/_event and fcgid_worker/_event; beside mod_php/_ruid2/_itk and suphp/_worker/_event
- Mail server: qmail-toaster instead special qmail (in progress: change from courier-imap to dovecot as imap/pop3) *)
- Database Server: MySQL or MariaDB
- Database Manager: PHPMyAdmin; Adminer, MyWebSql and SqlBuddy as additional **)
- Webmail: Afterlogic Webmail Lite, Telaen, Squirrelmail and Roundcube; Horde and T-Dah dropped
- FTP server: Pure-ftpd
- DNS Server: Bind and Djbdns; ready testing for Powerdns, MaraDNS and NSD *)
- Addons: ClamAV, Spamassassin/Bogofilter/Spamdyke and RKHunter
- Fixed many bugs of Kloxo Official (including security issues)
- And many more!
Prerequisites
Some stuff you need before installing:- A VPS or Dedicated Server (DS) running CentOS. In this tutorial I use (recommended) CentOS 6 x86_64 minimal.
- Ability to use SSH Client like Putty (or Terminal on Linux and Mac)
- Basic knowledge of Linux command
- About 30 minutes of your spare time
- A cup of Coffee or Tea if you like.
How to Install
Step 1 – Login to your server as root: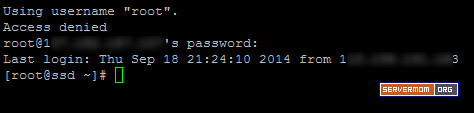
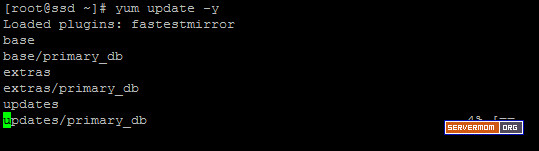
Step 2 – To make sure all things are updated, run ym update command:
1
| yum update -y |
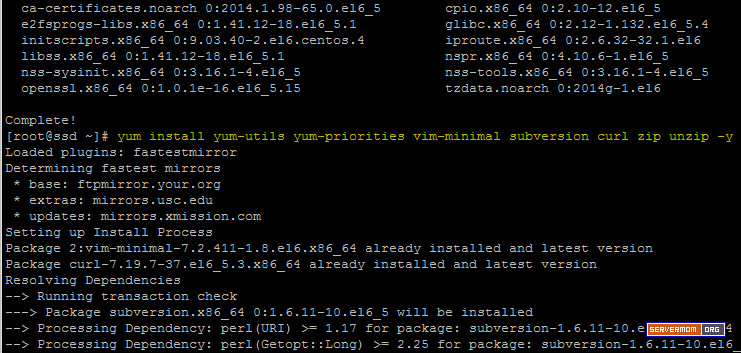
Step 3 – Issue this command to install some necessary packages:
1
| yum install yum-utils yum-priorities vim-minimal subversion curl zip unzip -y |
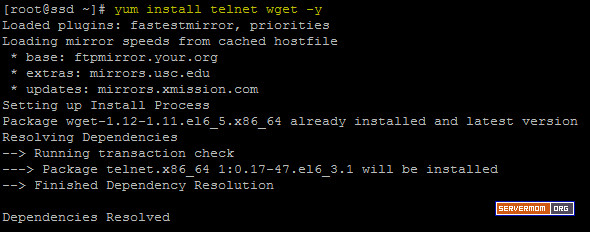
Also this one:
1
| yum install telnet wget -y |
Step 4 – Make sure SELinux is disabled. You can check it with this command:
1
| setenforce 0 |
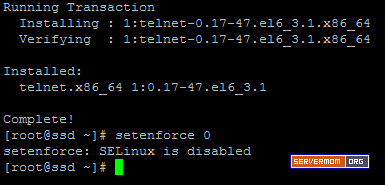
if not, you can disable it using this command:
1
| echo 'SELINUX=disabled' > /etc/selinux/config |
1
| cd /tmp |
1
| rm -f mratwork* |
1
2
| wget https://github.com/mustafaramadhan/kloxo/raw/rpms/release/neutral/noarch/mratwork-release-0.0.1-1.noarch.rpm --no-check-certificaterpm -ivh mratwork-release-0.0.1-1.noarch.rpm |
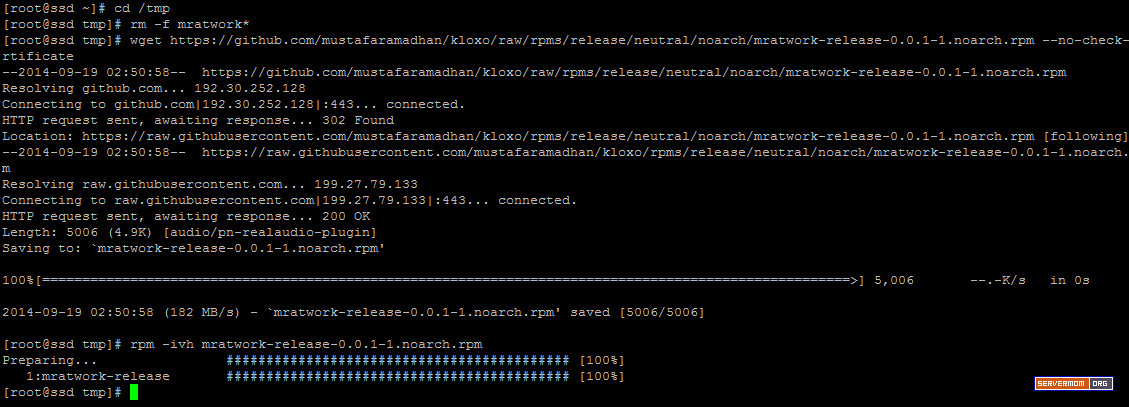
then go back to upper directory
1
| cd / |
1
2
| yum clean allyum update mratwork-* -y |
Step 7 – Now begin the install process with this command:
1
| yum install kloxomr7 -y |
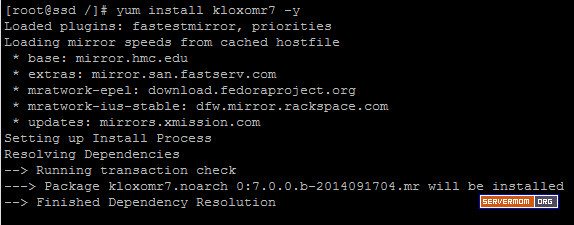
Once done you’ll see something like this:
Step 8 – Now the last magic command to issue is:
1
| sh /script/upcp |
And once done you’ll see something like this:
Step 9 – Now open up your favorite web browser and login to Kloxo-MR admin page for the very first time:
https://1ip-address:7777 – secure ssl connection, or..
http://1ip-address:7778 – normal one.
Default username is admin and password is admin.
That’s it. Wait for my next article. Do not forget to follow
Wednesday, October 7, 2015
4:47 AM
No comments
สวัสดีครับ
หัวข้อนี้จะเป็น 11 เทคนิค ที่ควรรู้ของ WRT54GL DD-WRT V24 Firmware ครับ
Tip1
เปลี่ยน Username และ Password เพื่อเข้า Mode Admin ของ WRT54GL

เพราะ โดยส่วนใหญ่จะเป็น admin/admin กันทั้งนั้น ถ้ามีคนแอบเข้า Network ผ่าน Wireless แล้วมาแก้ไข User/Password หรือมาตั้งค่าอะไรแปลกๆ ต้องเดือดร้อนมานั่ง Reset ตัว Router กันใหม่ หรือกว่าจะรู้ตัวพวกก็แอบใช้ Internet เราไปสบายๆครับ เพราะส่วนใหญ่พอเรา Set อะไรเรียบร้อยแล้วก็ไม่ค่อยกลับมาดูกัน
**ตั้งแล้วห้ามลืมนะครับ ไม่งั้นต้องมานั่ง Reset ตัว Router กันใหม่**
Tip2
ปรับ กำลังส่งสัญญาณ Wireless


เพื่อ เพิ่มกำลังการทะลุทะลวงของสัญญาณ Wireless ครับ แต่ยิ่งปรับมาก Speed จะยิ่งตกครับ เครื่องร้อนด้วย ควรปรับพอดีๆคือไม่ควรเกิน 120 หรือถ้าปรับมากไปจะกลายเป็นล่อตะเข้ไปอีก พวกเห็นสัญญาณแรงๆก็พยายามจะเข้ามาช่วยใช้กัน
Tip3
ตั้งค่า Wireless Security

สำคัญมากๆครับ กันเพื่อนบ้านมาช่วยใช้ กันพวกไป Post ตาม Webboard ในเรื่องประเภทแหย่ขาเข้าคุก เพราะ IP ที่โชว์จะเป็น IP ขา Wan ซึ่งทาง ISP
เขาตรวจสอบได้ครับว่าวันนี้เวลานี้ใครได้ IP นี้ไป เราซึ่งเป็นเจ้าของเบอร์
ก็รับเคราะห์ไป
เพราะ IP ที่โชว์จะเป็น IP ขา Wan ซึ่งทาง ISP
เขาตรวจสอบได้ครับว่าวันนี้เวลานี้ใครได้ IP นี้ไป เราซึ่งเป็นเจ้าของเบอร์
ก็รับเคราะห์ไป
แต่..ต้องดูอุปกรณ์ตัวรับด้วยนะครับว่ารองรูปแบบ การ Encryption แบบไหนบ้าง ส่วนใหญ่ก็จะปรับเป็นแบบ WPA2 กัน ตั้ง Key ที่ยาวๆประหลาดๆซักหน่อยก็ดีครับ ไม่ต้องกลัวลืม เพราะถ้าลืมเราก็เสียบสาย Lan เข้า WRT54GL แล้ว Login เข้ามาดูได้ครับ ด้วยการ Click ที่ Unmask ส่วน WEP ถ้าไม่จำเป็นไม่ต้องใช้ครับ Hack ง่ายมาก หรือถ้าจำเป็นต้องใช้จริงๆควรใช้ร่วมกับ Tip9 ครับ
Tip4
ตั้งเวลาการ Reboot WRT54GL

เนื่อง จากอุปกรณ์ WRT54GL มันเป็นอุปกรณ์ที่เรียกว่า Embeded Linux มี CPU มี RAM ในการ Process ก็เหมือนกับเครื่อง Computer ทั่วๆไปละครับ ควรต้องมีการ Reboot กันบ้างเพื่อ Clear Resource ต่างๆ ควรตั้งเวลา Reboot ไว้ตอนช่วงที่ไม่ค่อยมีใครใช้กัน
Tip5
Static Leases


โดย ปกติถ้าเราตั้งให้ WRT54GL เป็น DHCP ซึ่งจะมีหน้าที่แจก IP ทีนี้ถ้าเราต้องการให้แจก IP กับเครื่อง Computer ที่ใช้ด้วย IP เดิมๆตลอด เพื่อที่เราจะไปใช้กับ Port Forward เพื่อจะ Load Bittorrent หรืออะไรก็แล้วแต่ สามารถปรับตรงนี้ได้เลยครับ โดยอุปกรณ์ WRT54GL จะตรวจสอบจากค่า MAC Address ของอุปกรณ์ Network ในเครื่อง Computer เช่น Lan card หรือ Wireless card ที่ Connect เข้ามา เพราะค่า MAC Address มันเปลี่ยนไม่ได้ครับ (เปลี่ยนได้ แต่ไม่ค่อยมีใครเขาทำกัน)
Tip6
ตรวจสอบว่ามีใครเข้ามาใน Network เรามั้ง


ถ้ามีโอกาสควรตรวจสอบหน้านี้ซักหน่อยก็ดีครับ ซึ่งจะบอกว่าใครเข้ามาใช้ใน Network เรามั้ง เห็นแปลกๆก็ Delete ออกไปเลย
Tip7
การใช้ Dynamic DNS

เผื่อ ที่เราต้องการ Remote เข้ามา Config อุปกรณ์จากข้างนอก เช่นที่ทำงาน หรือจะตั้ง Webserver ไว้ที่บ้าน หรือจะใช้กับอุปกรณ์กล้อง IP Camera
Dynamic DNS สมัครได้ฟรีที่ www.dyndns.org ครับ
*** ใช้กับใน Mode PPPoE หรืออุปกรณ์ WRT54GL ทำหน้าที่เป็น Gateway เท่านั้น ***
Tip8
Port Forward

ส่วน ใหญ่ใช้ร่วมกับ Tip7 ครับ เช่นใช้กับ IP Camera, Remote Access, Webserver หรือกระทั่ง Set Connectable=true ในโปรแกรม Bittorrent
*** ใช้กับใน Mode PPPoE หรืออุปกรณ์ WRT54GL ทำหน้าที่เป็น Gateway เท่านั้น ***
Tip9
Wireless MAC Filter


เป็น การ Filter ตาม MAC Address ของเครื่อง Computer ที่พยายาม Connect จาก Wireless เป็นการเพิ่ม Security อีกขั้นนึงครับ จากรูปจะเป็นการยอมให้เฉพาะ MAC Address ที่กำหนดสามารถ Connect ผ่าน Wireless ได้เท่านั้น ถ้าไม่ Serious มาก ก็ไม่จำเป็นต้องกำหนดครับ แค่ตั้งค่า Wireless Security ตาม Tip3 ก็เหลือเฟือแล้วครับ
Tip10
ปรับเสาอากาศ Antenna

TX Antenna เป็นเสาต้นที่สัญญาณที่ส่งออกไป จากรูปจะตั้งเป็น Auto
RX Antenna เป็นเสาต้นที่รับสัญญาณเข้ามา จากรูปจะเป็น Right
จะใช้ในกรณีที่เราต้องการเปลี่ยนเสาครับ เช่นเสาต้นขวาเปลี่ยนเป็นเสา 9.5dBi เพื่อให้สามารถรับสัญญาณได้ดียิ่งขึ้น
Tip11
Backup/Restore ค่าที่ Setup ไว้

เป็น เครื่องมือกันเซ็ง ในกรณี WRT54GL เกิด Hang มีไฟกระชากทำให้ค่าต่างๆที่ Set มากลายเป็นค่า Default เราต้องมานั่ง Set กันใหม่ เซ็งและเสียเวลาสุดๆ เราก็ Backup ไว้ก่อน พอเกิดปัญหาก็สามารถ Restore ค่าที่เรา Set เอาไว้กลับมาได้ครับ
จบบทความครับผม
หัวข้อนี้จะเป็น 11 เทคนิค ที่ควรรู้ของ WRT54GL DD-WRT V24 Firmware ครับ
Tip1
เปลี่ยน Username และ Password เพื่อเข้า Mode Admin ของ WRT54GL
เพราะ โดยส่วนใหญ่จะเป็น admin/admin กันทั้งนั้น ถ้ามีคนแอบเข้า Network ผ่าน Wireless แล้วมาแก้ไข User/Password หรือมาตั้งค่าอะไรแปลกๆ ต้องเดือดร้อนมานั่ง Reset ตัว Router กันใหม่ หรือกว่าจะรู้ตัวพวกก็แอบใช้ Internet เราไปสบายๆครับ เพราะส่วนใหญ่พอเรา Set อะไรเรียบร้อยแล้วก็ไม่ค่อยกลับมาดูกัน
**ตั้งแล้วห้ามลืมนะครับ ไม่งั้นต้องมานั่ง Reset ตัว Router กันใหม่**
Tip2
ปรับ กำลังส่งสัญญาณ Wireless
เพื่อ เพิ่มกำลังการทะลุทะลวงของสัญญาณ Wireless ครับ แต่ยิ่งปรับมาก Speed จะยิ่งตกครับ เครื่องร้อนด้วย ควรปรับพอดีๆคือไม่ควรเกิน 120 หรือถ้าปรับมากไปจะกลายเป็นล่อตะเข้ไปอีก พวกเห็นสัญญาณแรงๆก็พยายามจะเข้ามาช่วยใช้กัน
Tip3
ตั้งค่า Wireless Security
สำคัญมากๆครับ กันเพื่อนบ้านมาช่วยใช้ กันพวกไป Post ตาม Webboard ในเรื่องประเภทแหย่ขาเข้าคุก
เพราะ IP ที่โชว์จะเป็น IP ขา Wan ซึ่งทาง ISP
เขาตรวจสอบได้ครับว่าวันนี้เวลานี้ใครได้ IP นี้ไป เราซึ่งเป็นเจ้าของเบอร์
ก็รับเคราะห์ไป แต่..ต้องดูอุปกรณ์ตัวรับด้วยนะครับว่ารองรูปแบบ การ Encryption แบบไหนบ้าง ส่วนใหญ่ก็จะปรับเป็นแบบ WPA2 กัน ตั้ง Key ที่ยาวๆประหลาดๆซักหน่อยก็ดีครับ ไม่ต้องกลัวลืม เพราะถ้าลืมเราก็เสียบสาย Lan เข้า WRT54GL แล้ว Login เข้ามาดูได้ครับ ด้วยการ Click ที่ Unmask ส่วน WEP ถ้าไม่จำเป็นไม่ต้องใช้ครับ Hack ง่ายมาก หรือถ้าจำเป็นต้องใช้จริงๆควรใช้ร่วมกับ Tip9 ครับ
Tip4
ตั้งเวลาการ Reboot WRT54GL
เนื่อง จากอุปกรณ์ WRT54GL มันเป็นอุปกรณ์ที่เรียกว่า Embeded Linux มี CPU มี RAM ในการ Process ก็เหมือนกับเครื่อง Computer ทั่วๆไปละครับ ควรต้องมีการ Reboot กันบ้างเพื่อ Clear Resource ต่างๆ ควรตั้งเวลา Reboot ไว้ตอนช่วงที่ไม่ค่อยมีใครใช้กัน
Tip5
Static Leases
โดย ปกติถ้าเราตั้งให้ WRT54GL เป็น DHCP ซึ่งจะมีหน้าที่แจก IP ทีนี้ถ้าเราต้องการให้แจก IP กับเครื่อง Computer ที่ใช้ด้วย IP เดิมๆตลอด เพื่อที่เราจะไปใช้กับ Port Forward เพื่อจะ Load Bittorrent หรืออะไรก็แล้วแต่ สามารถปรับตรงนี้ได้เลยครับ โดยอุปกรณ์ WRT54GL จะตรวจสอบจากค่า MAC Address ของอุปกรณ์ Network ในเครื่อง Computer เช่น Lan card หรือ Wireless card ที่ Connect เข้ามา เพราะค่า MAC Address มันเปลี่ยนไม่ได้ครับ (เปลี่ยนได้ แต่ไม่ค่อยมีใครเขาทำกัน)
Tip6
ตรวจสอบว่ามีใครเข้ามาใน Network เรามั้ง
ถ้ามีโอกาสควรตรวจสอบหน้านี้ซักหน่อยก็ดีครับ ซึ่งจะบอกว่าใครเข้ามาใช้ใน Network เรามั้ง เห็นแปลกๆก็ Delete ออกไปเลย
Tip7
การใช้ Dynamic DNS
เผื่อ ที่เราต้องการ Remote เข้ามา Config อุปกรณ์จากข้างนอก เช่นที่ทำงาน หรือจะตั้ง Webserver ไว้ที่บ้าน หรือจะใช้กับอุปกรณ์กล้อง IP Camera
Dynamic DNS สมัครได้ฟรีที่ www.dyndns.org ครับ
*** ใช้กับใน Mode PPPoE หรืออุปกรณ์ WRT54GL ทำหน้าที่เป็น Gateway เท่านั้น ***
Tip8
Port Forward
ส่วน ใหญ่ใช้ร่วมกับ Tip7 ครับ เช่นใช้กับ IP Camera, Remote Access, Webserver หรือกระทั่ง Set Connectable=true ในโปรแกรม Bittorrent
*** ใช้กับใน Mode PPPoE หรืออุปกรณ์ WRT54GL ทำหน้าที่เป็น Gateway เท่านั้น ***
Tip9
Wireless MAC Filter
เป็น การ Filter ตาม MAC Address ของเครื่อง Computer ที่พยายาม Connect จาก Wireless เป็นการเพิ่ม Security อีกขั้นนึงครับ จากรูปจะเป็นการยอมให้เฉพาะ MAC Address ที่กำหนดสามารถ Connect ผ่าน Wireless ได้เท่านั้น ถ้าไม่ Serious มาก ก็ไม่จำเป็นต้องกำหนดครับ แค่ตั้งค่า Wireless Security ตาม Tip3 ก็เหลือเฟือแล้วครับ
Tip10
ปรับเสาอากาศ Antenna
TX Antenna เป็นเสาต้นที่สัญญาณที่ส่งออกไป จากรูปจะตั้งเป็น Auto
RX Antenna เป็นเสาต้นที่รับสัญญาณเข้ามา จากรูปจะเป็น Right
จะใช้ในกรณีที่เราต้องการเปลี่ยนเสาครับ เช่นเสาต้นขวาเปลี่ยนเป็นเสา 9.5dBi เพื่อให้สามารถรับสัญญาณได้ดียิ่งขึ้น
Tip11
Backup/Restore ค่าที่ Setup ไว้
เป็น เครื่องมือกันเซ็ง ในกรณี WRT54GL เกิด Hang มีไฟกระชากทำให้ค่าต่างๆที่ Set มากลายเป็นค่า Default เราต้องมานั่ง Set กันใหม่ เซ็งและเสียเวลาสุดๆ เราก็ Backup ไว้ก่อน พอเกิดปัญหาก็สามารถ Restore ค่าที่เรา Set เอาไว้กลับมาได้ครับ
จบบทความครับผม
Subscribe to:
Comments (Atom)


